
QuickBooks Welcome Guide
10 simple tasks to help you get started
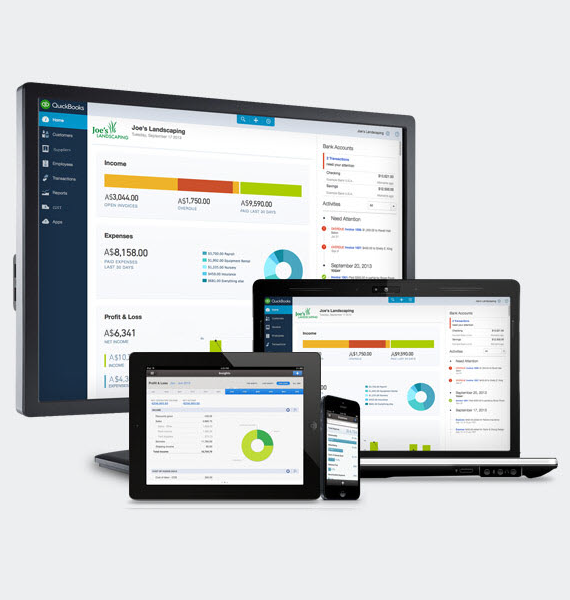
The Home Page shows a summary of important information and provides links to resources to help you navigate QuickBooks Online.
Here is the quickest way to navigate in QuickBooks.
 The navigation bar on the left shows a menu of items. Click an item to manage your Customers, Suppliers, Transactions, Reports and GST.
 Click Transactions to see related sub-items (like Banking).
 Click the magnifying glass to quickly find past transactions. Search by transaction number, date or monetary amount. Use the Advanced Search to combine your search terms.
 Click the Create (+) icon to add any transaction.
 View a list of recent transactions. Click a selection to open it directly from this list or click More to search for a specific transaction.
 Click the Gear icon to manage your subscription, users, companies and settings.
 Click the Help (?) icon to get help information.
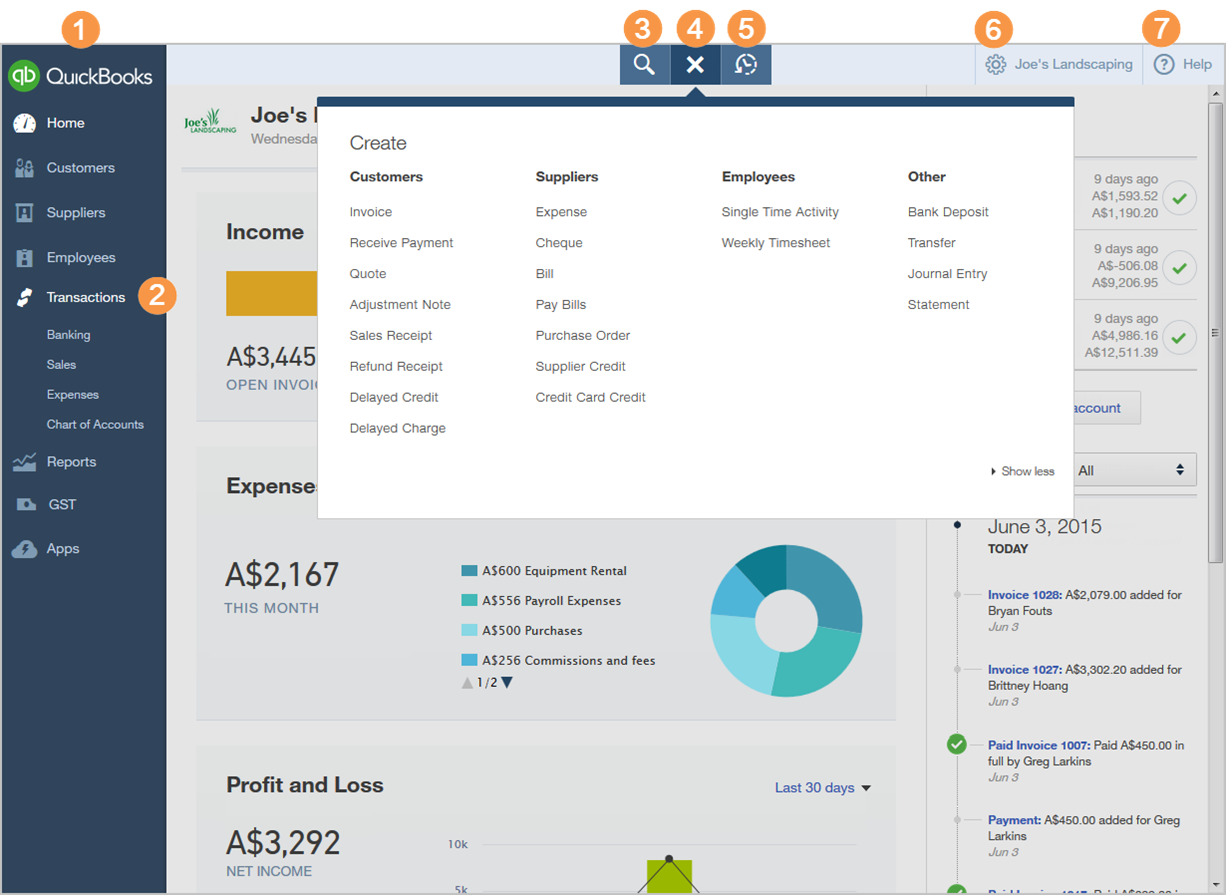
The Create icon initially appears as a (+) but changes to an (x) when you click it.
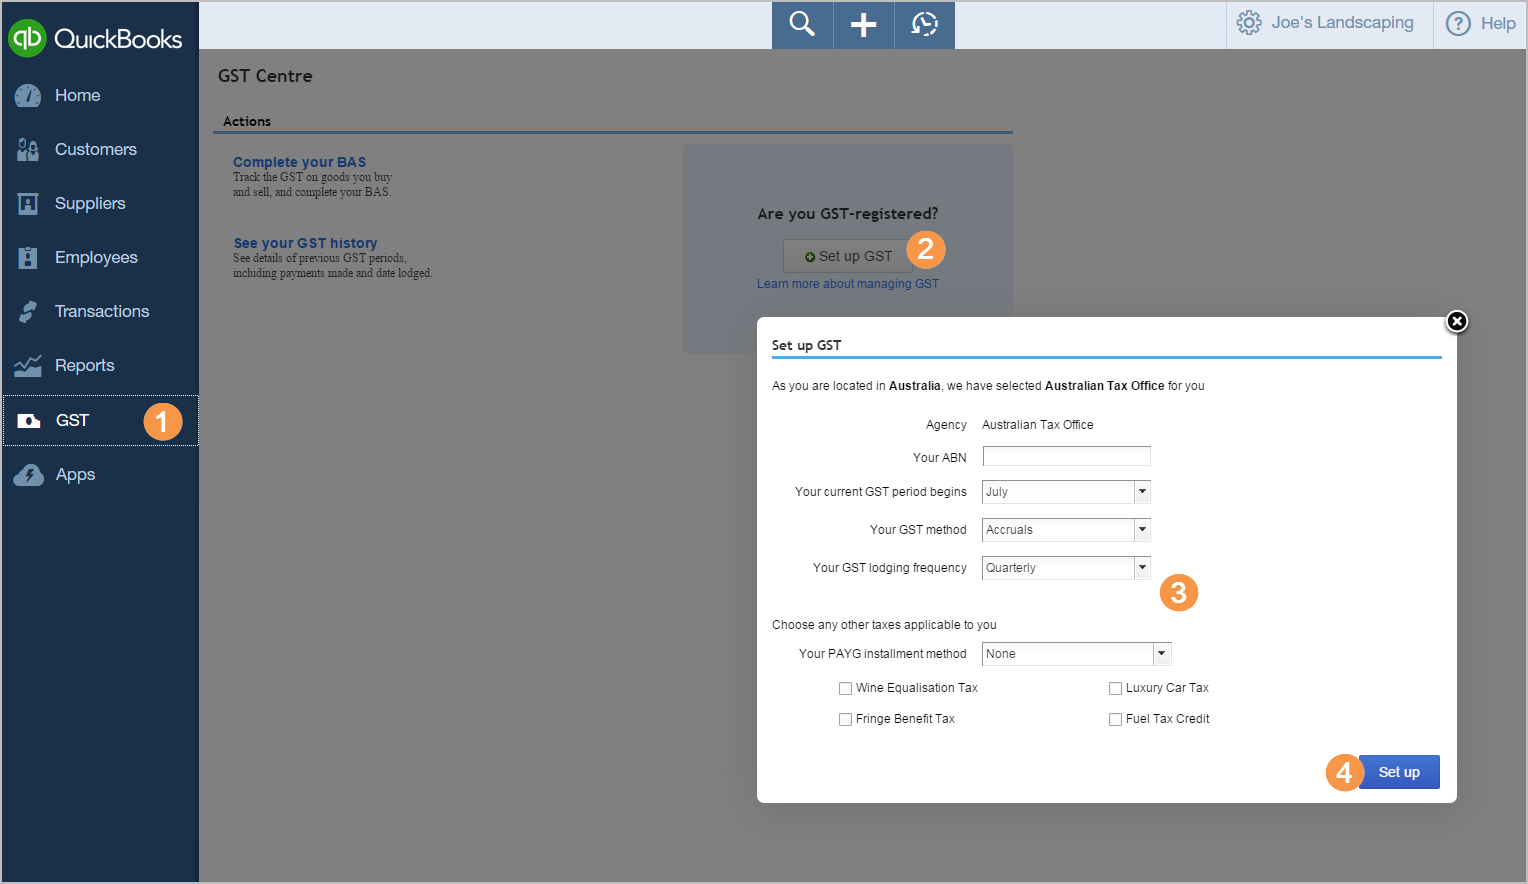
If you charge GST, make sure you set it up before you enter any transactions in QuickBooks Online.
Once GST is turned on, it can't be turned off.
Click GST in the left navigation bar.
On the GST page, click Set up GST.
Enter the GST details.
Click Set up.
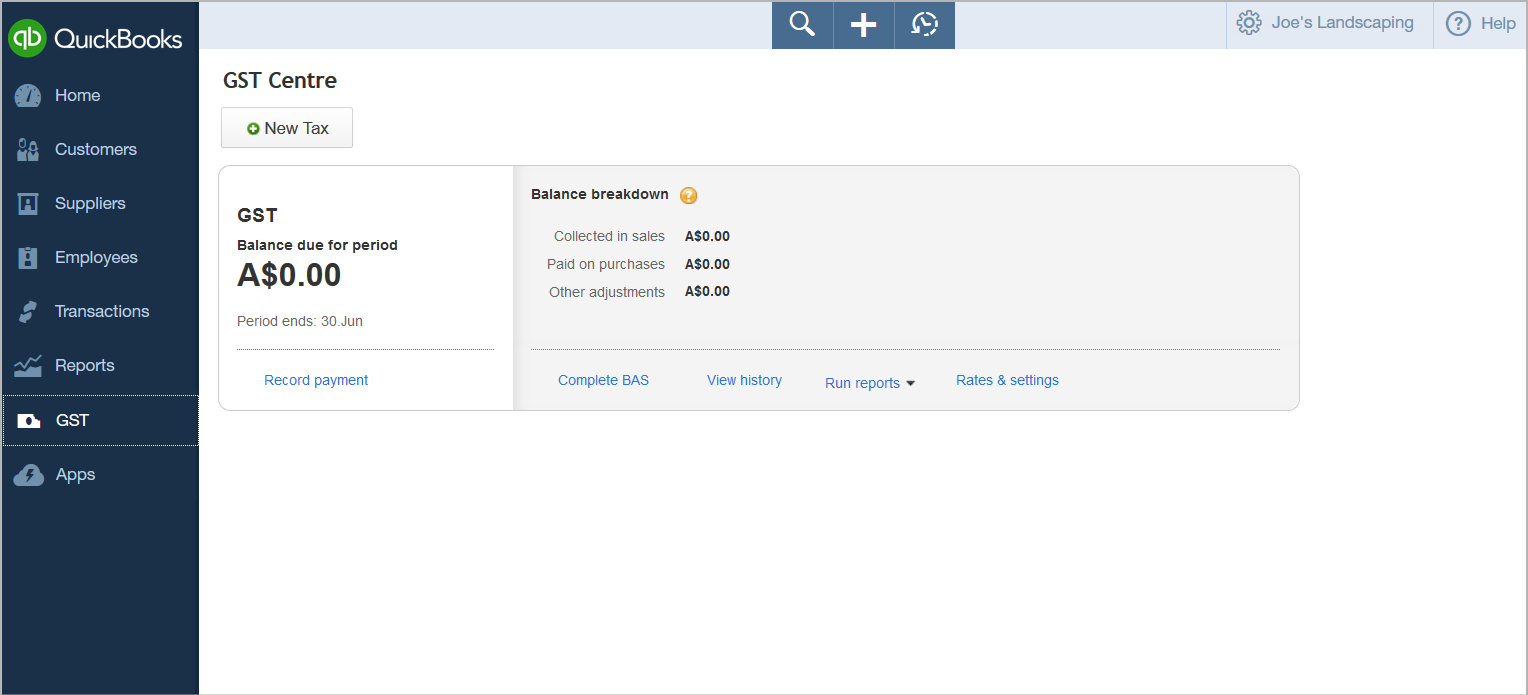
From now on, you can access the GST page in the left navigation bar. From here, you can:
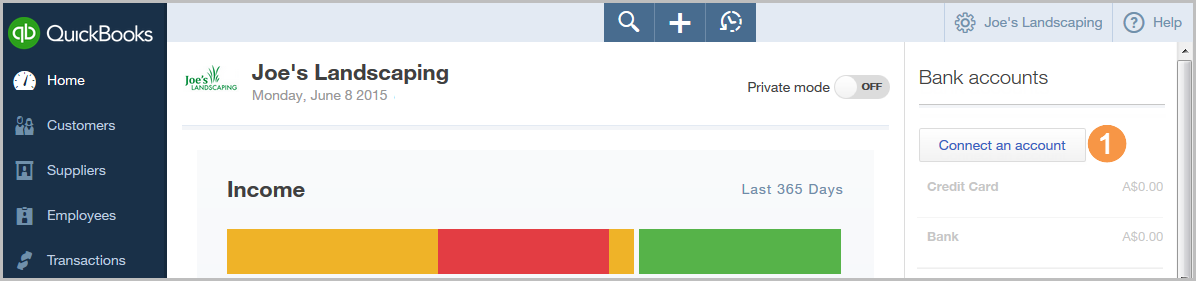
To save time and reduce errors, use QuickBooks Online to automatically download and categorise your bank and credit card transactions from a secure online connection.
Once you have established a secure connection with your bank, your transactions will automatically transfer to your QuickBooks Online company file.
From the home page, click Connect an account.
Follow the onscreen instructions to select your bank, enter your sign in information, and connect your account.
From the navigation bar, select Transactions > Banking.
Click Update to download the latest bank data or upload a bank statement.
Click Add to add the transaction to QuickBooks.
Click a column header to sort by that heading.
Print a page of transactions.
 Change the number of rows to display.
 Review the transactions you added to QuickBooks.

As an alternative to connecting your bank, you can import your bank transactions manually. Simply click File upload and follow the onscreen instructions.
It’s easy to create and customise beautiful invoices to send to your customers.
Before you create your first invoice, make sure you have set up GST.
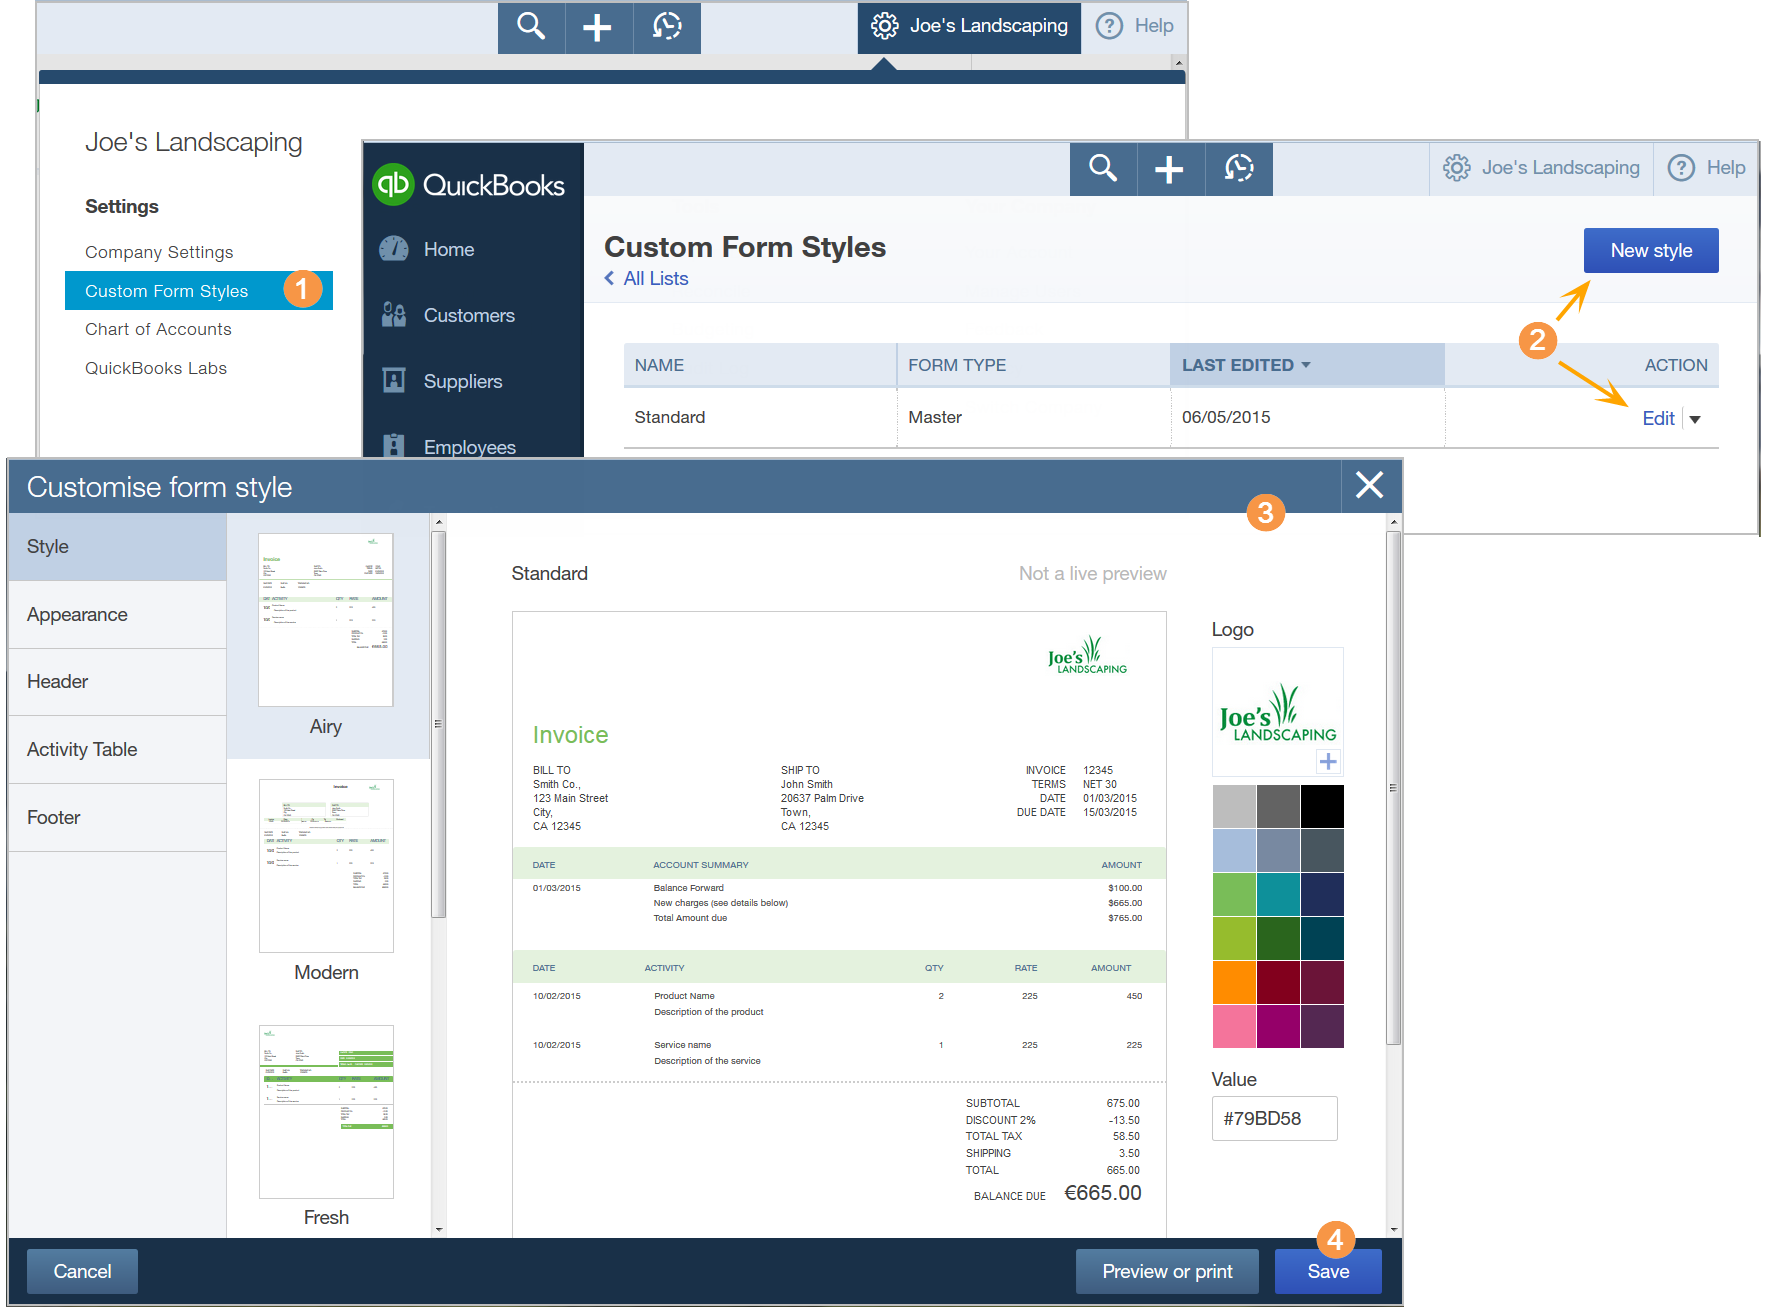
Click the Gear icon and select Custom Form Styles.
Edit the Standard style (to apply a consistent look to all forms) or create a New style (recommended if you want different styles for each form).
Customise the style as desired, and upload your logo if you have not done so already.
Click Save to save your customisations.
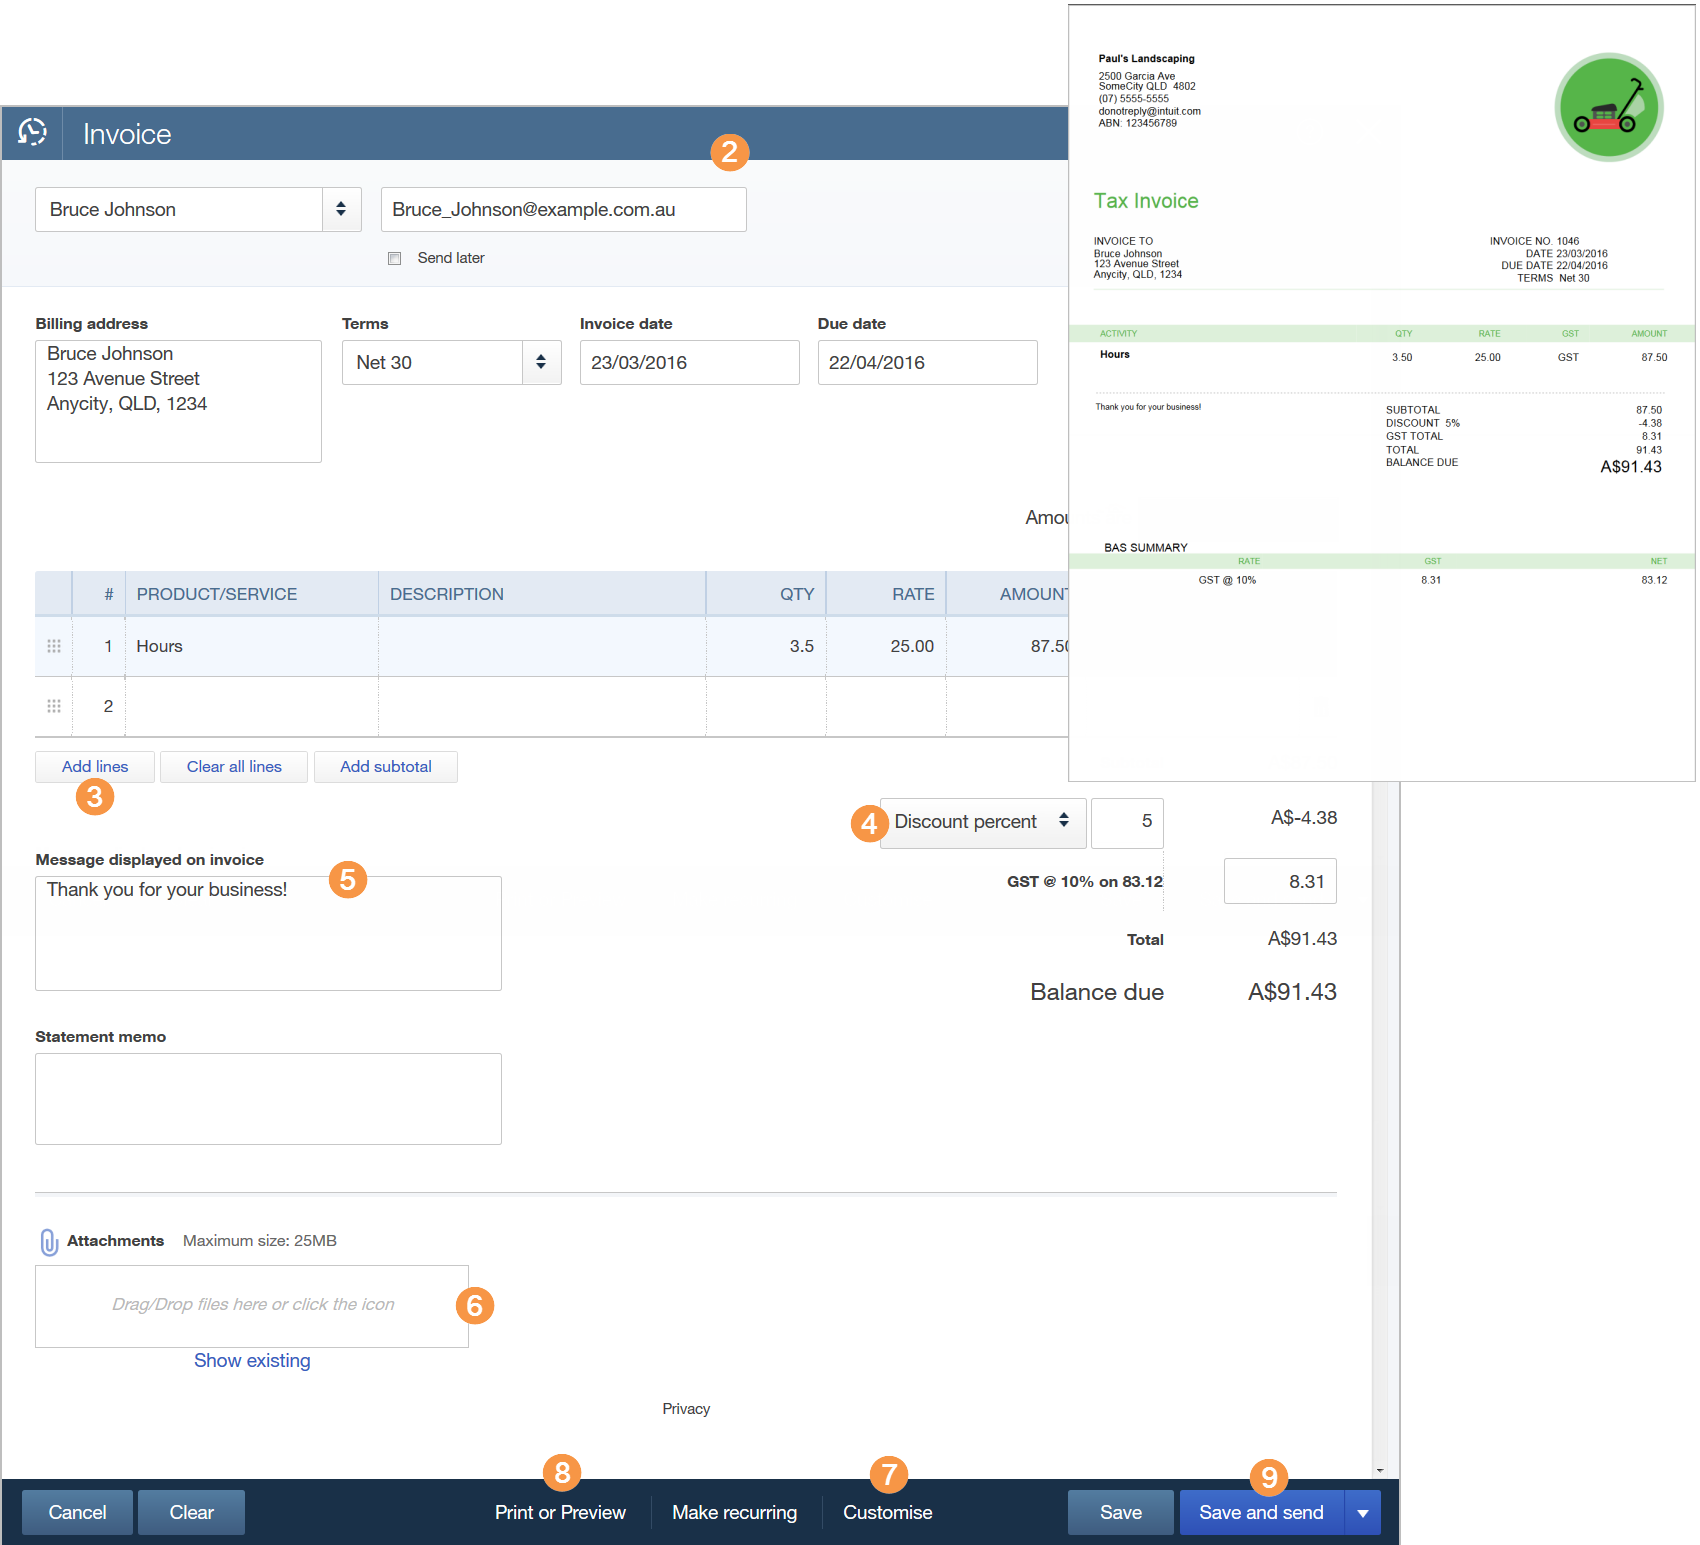
Click the Create (+) icon and select Invoice.
Fill in the invoice form.
Add more lines if needed.
(Optional) Apply a discount.
(Optional) Add a message to display on the invoice.
(Optional) Add an attachment.
Click Customise at the bottom of the form to select the Custom Form Style to use (if you set up a new style).
Click Print or Preview to see how the invoice looks.
Click Save and send.
QuickBooks keeps you organised by helping you collect payments against customer invoices.
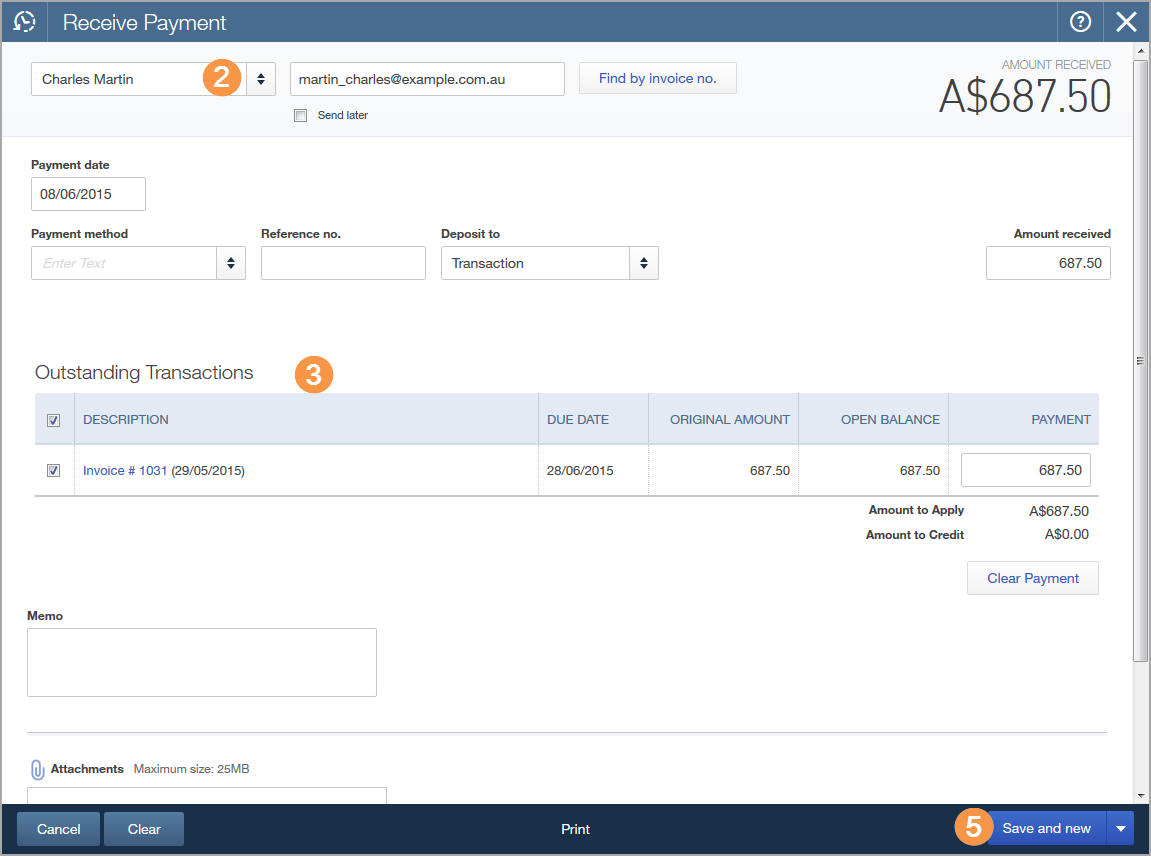
Click the Create (+) icon and select Receive Payment.
Select a customer from the list.
Fill in the rest of the Receive Payment form.
If the customer has outstanding invoices, they appear here so you can apply the payment to them.
Click Save and new.
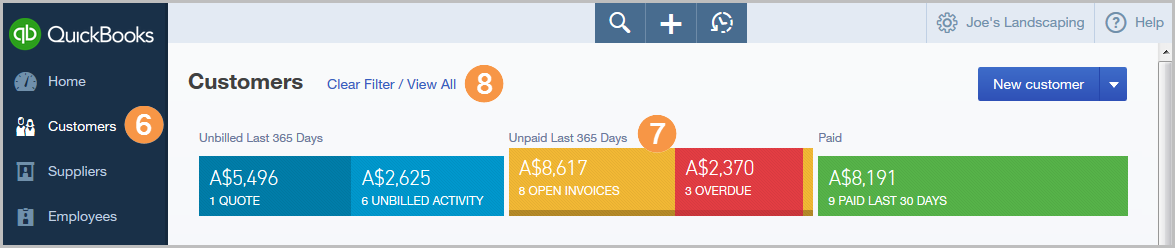
To find open invoices, use the Search or Recent Transactions list, run a report, or go to the Customers page.
On the Customers page, click the Unpaid section of the Money Bar at the top of the page to filter the view to outstanding invoices only.
Click Clear Filter/View All to remove the filter.
Enter and categorise your business expenses so you're ready for tax time.
Click the Create (+) icon and select Expense.
Fill in the Expense form.
Select the account you are paying the expense from.
(Optional) Choose a payment method.
Enter a reference number so the transaction is easy to find later.
Include the account so QuickBooks categorises each line item.
Select the applicable account. This ensures that QuickBooks categorises each line item to the appropriate account.
(Optional) Attach a document (like a receipt).
You can make this a recurring expense to save time later.
You can make this a recurring expense to save time later. This allows you to create a template and set the interval so you can make this payment automatically as needed.
Click Save and new.

You can also access expenses from the left navigation bar (Transactions > Expenses), and then click New transaction > Expense to create a new expense.
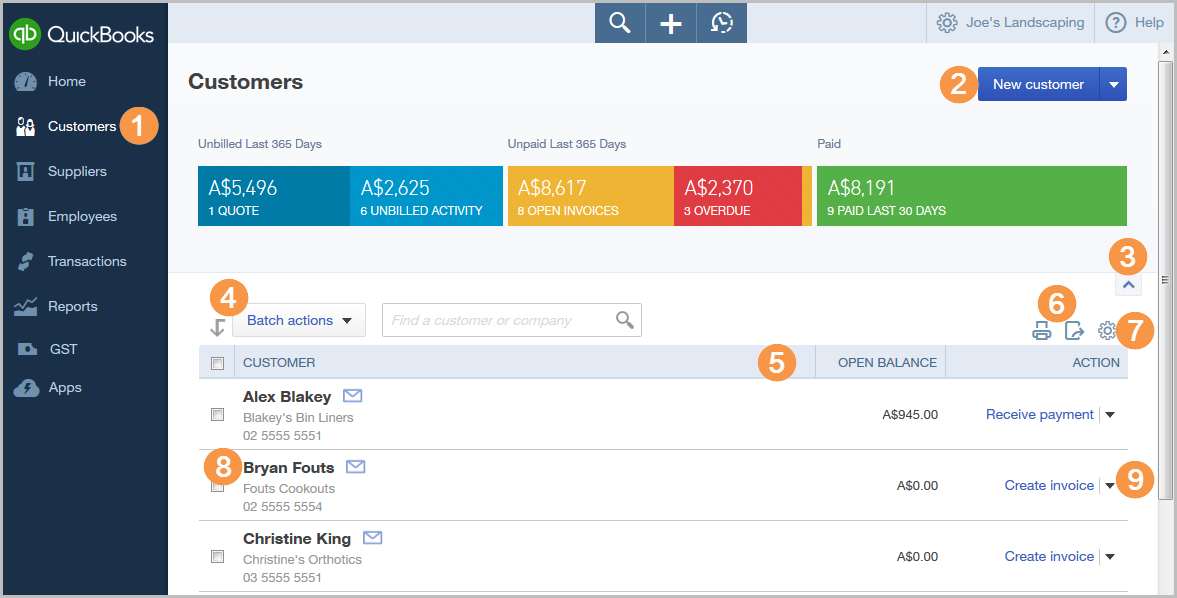
Keep track of all of the people who are important to your business, from customers to suppliers to employees.
From the navigation bar, select Customers.
Add or import a customer.
Show or hide the Customer Money Bar.
Select multiple customers and apply a batch action (like Send statements) to all of them at once.
Click the desired header to sort the customer list by name, company, or balance.
Print or export the customer list.
Choose the columns you want to display.
Click a customer to see more details.
Create an invoice or other item for this customer.
How's your business doing? Monitor the financial data of your company with a variety of customisable reports.
From the navigation bar, click Reports.
Hover over a report to preview the layout.
Search for a specific report by name.
Click a recommended report or choose another tab: Frequently Run, My Custom Reports, or All Reports.
You can customise a report before you open it or click Customise after you open it.
Use the navigation items in the left column to navigate the options and customise your report.
Click Run Report to display the report with your changes.
Click Email to send the report to a specified recipient with a subject line and a note. The report will appear both as an attachment and in the body of the email.
Click Export to export your report to Microsoft Excel so you can make more changes. The Excel formulas are also exported.
After you run the report, click Save Customisations to save your custom settings (not shown). You can find this custom report later in the My Custom Reports section of the Reports page.
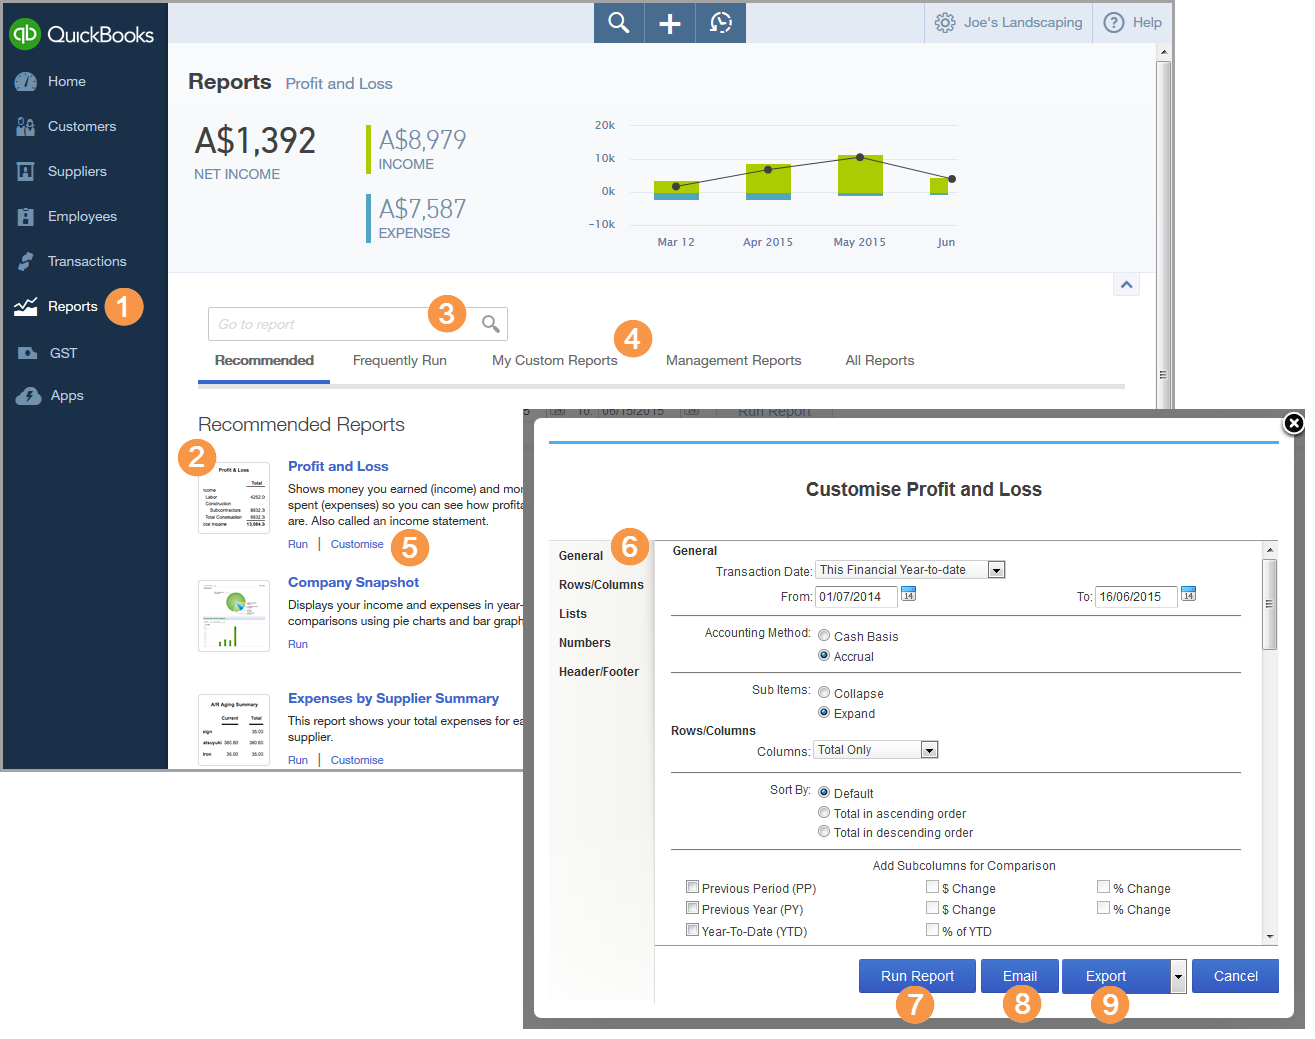
The two reports you'll run most often are Profit and Loss and Balance Sheet reports. They're found at the top of the Recommended and All Reports sections of the Reports page. Any reports that you run on a regular basis will also be listed in the Frequently Run section for easy access.
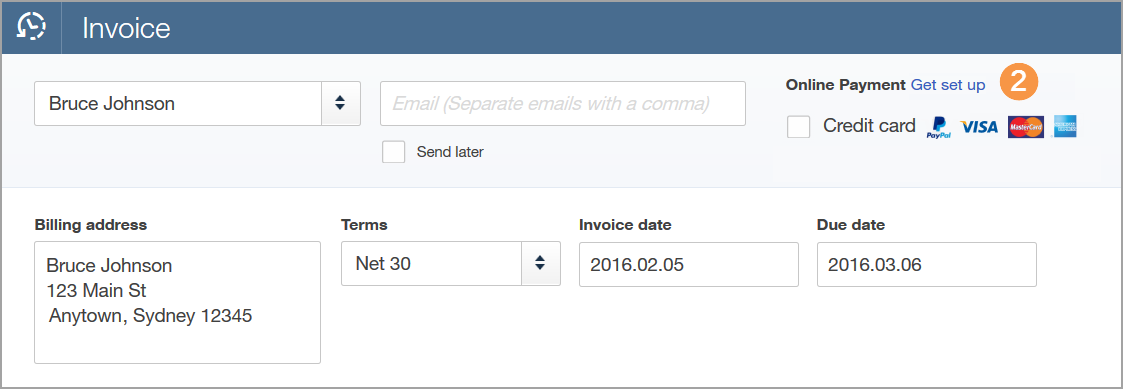
Offer your customers an easy, online way to pay their invoices. You'll get paid faster, too.
Click the Create (+) icon and select Invoice.
At the top of the page, switch on Online Payment.
You can find detailed setup instructions here.
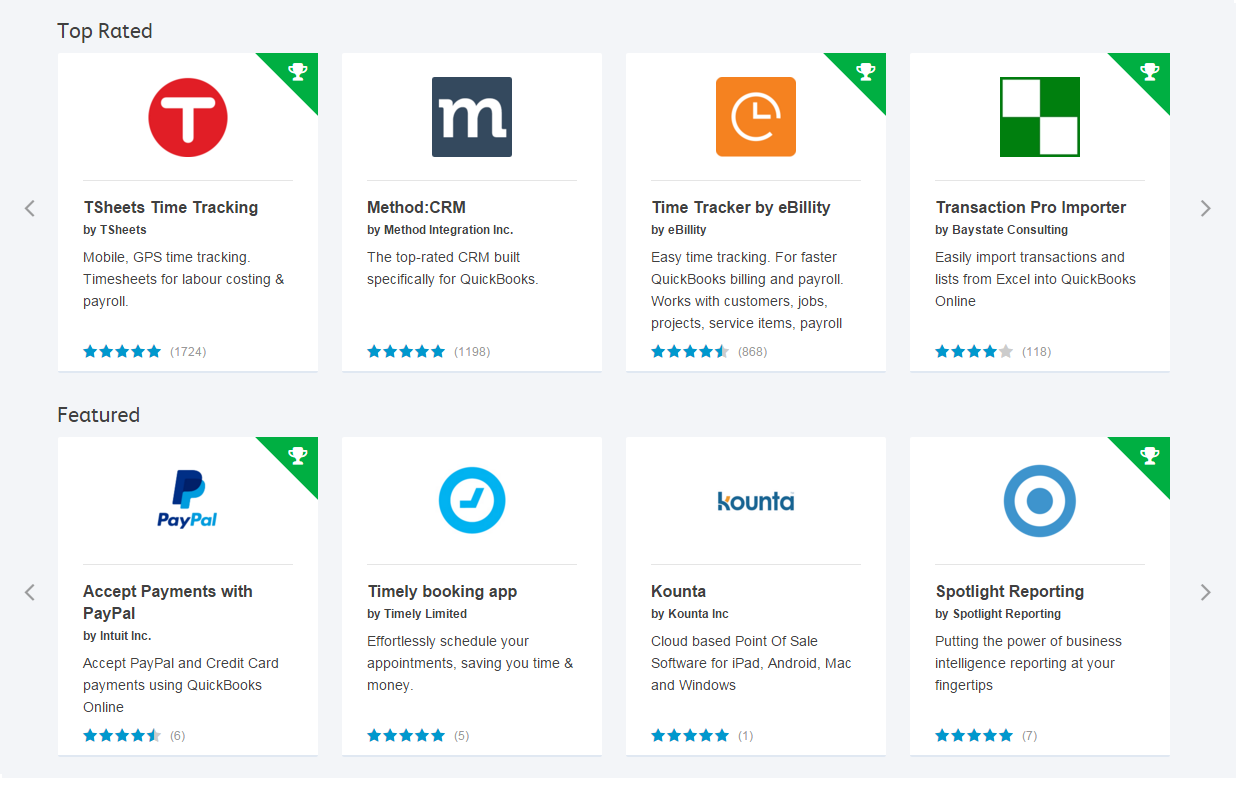
Extend the power of QuickBooks with apps for time tracking, billing, and more. Try any app for free!
Go to: Navigation bar > Apps
QuickBooks can help you manage your business wherever you are. It is available across your computer, Apple, or Android devices.
Visit:www.intuit.com.au/mobile
The app is easy to use and you don't have to sync any data; it's all done automatically for you.
In addition to the mobile app, the full web version of QuickBooks Online can be launched from the mobile browser on tablets.
© 2016 Intuit, Inc. All rights reserved. Intuit and QuickBooks are registered trade marks of Intuit, Inc. Terms and conditions, features, support, pricing and service options subject to change without notice.